Highlights
- Unlock the Polygun by shooting 13 hidden white cubes in the Labyrinth in one life without dying.
- Make sure to have the full ‘Corrupted Loadout’ including specific Archetypes and weapons.
- Polygun stats show decent damage with a unique active reload mechanic, but overall falls short compared to other DLC weapons.
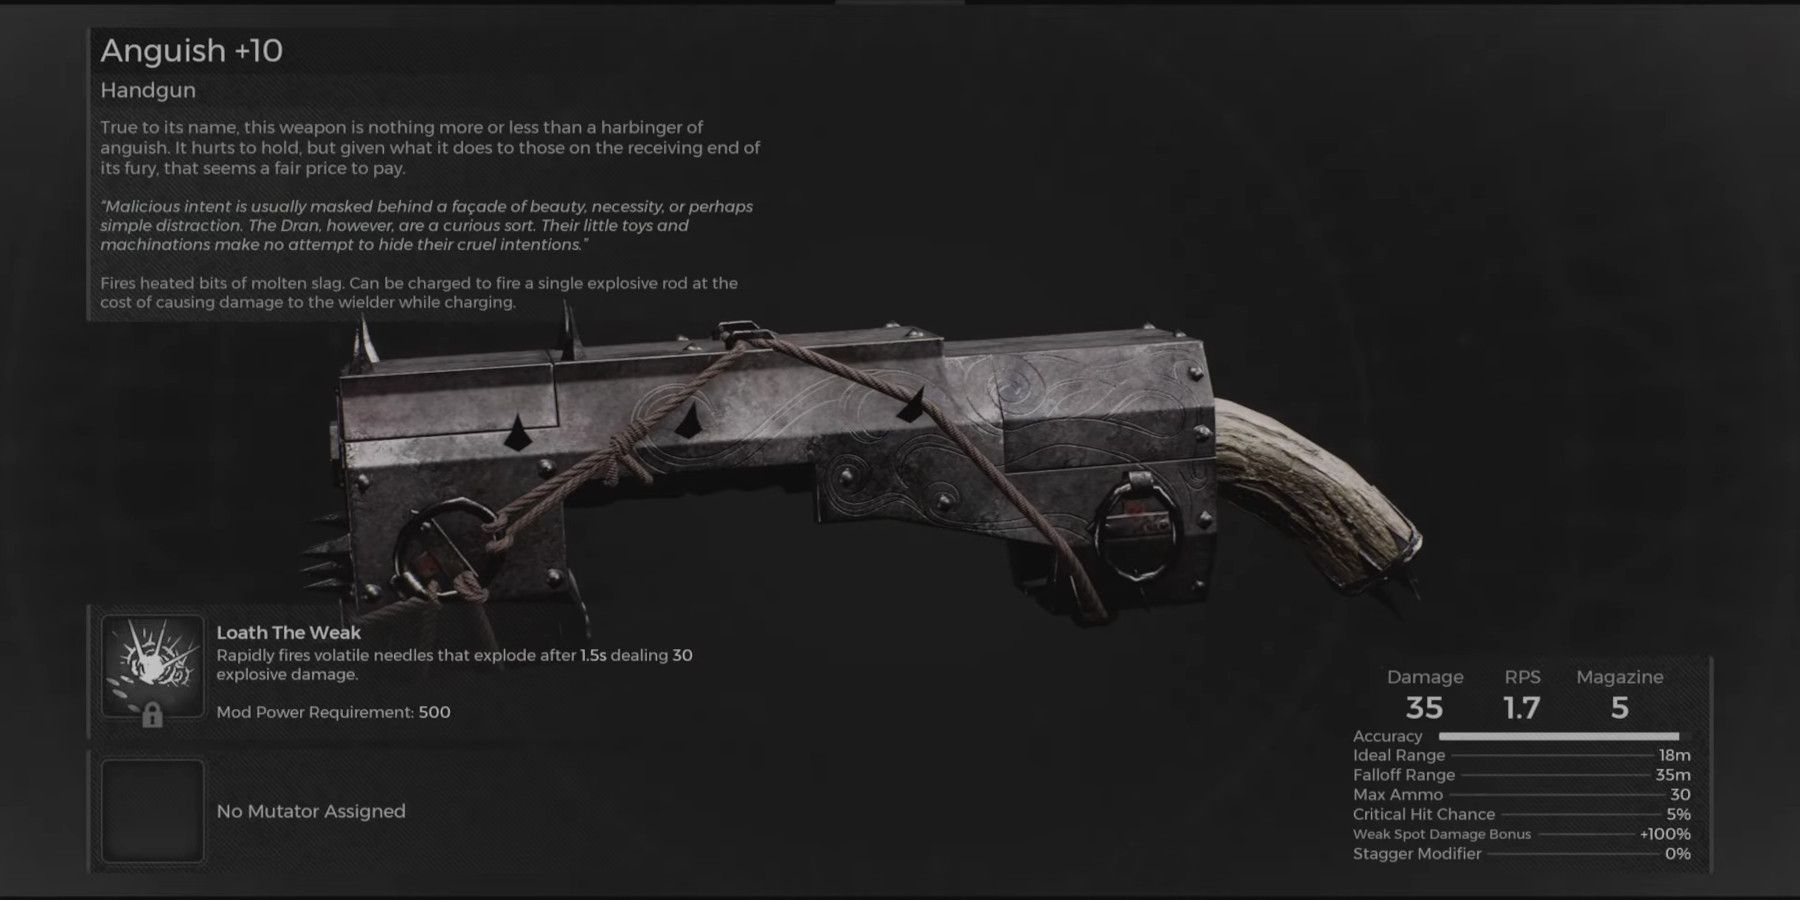
The Polygun is yet another one of Remnant 2’s absurdly well-hidden secrets. This game, made by Arc Games (previously Gunfire Games) has all sorts of obtuse secrets in it such as the Archon Archetype, the Anguish Handgun, or any of the other hundreds of Rings, Amulets, and Weapons. The Polygun is another well-hidden item Remnant 2 players can find, but it’s going to take quite a bit of work to do so.
Related
Remnant 2: Best Hand Guns, Ranked
With around 25+ Hand Guns to choose from in Remnant 2, a lot of players don’t know which one really packs the most punch, figuratively and literally.
First off, players need to have a campaign set up that was started after the release of the Forgotten Kingdom DLC. Trying this with a campaign started before said DLC will only lead them to do all the work but end up with no reward. Second, players will need to get past the first Realm in their Campaign and make it to the Labyrinth. Once they make it to the Labyrinth, they’ll also basically want to clear out the Labyrinth in full, including the Labyrinth Sentinel. After that, they’re pretty much all set to start hunting down the Polygun.
Updated August 11th, 2024 by Jacob Buchalter: Sadly, all this time after the Polygun was found, it’s pretty widely agreed upon as a pretty terrible gun overall. The focus required to keep up with the active reload mini-game usually causes you to get hit more often than it helps combat go by quicker, and its overall damage is just lackluster, to say the least. Still, half of the fun of collecting items in Remnant 2 is more for the act of figuring out the secret and collecting them rather than just obtaining some new overpowered weapon to use. And, as far as game secrets go, the Polygun is one of the most involved ones in recent memory. All that said, let’s take another look at the unlock process for this gun and see if there have been any updates or changes.
How to Obtain The Polygun
It’s Basically A Scavenger Hunt

Now, how does one actually obtain this secret new gun? Well, it involves hunting down and shooting 13 different floating white constructs hidden all over the Labyrinth. You have to shoot them in order (they only appear one after another) and you have to do it all in one life without dying or interacting with a World Stone. Thankfully, the consequences are relatively tame, as you’ll just have to restart from the first cube if you die or accidentally sit at a World Stone.
Additionally, you will also need the full ‘Corrupted Loadout’ that you needed to get the Archon Archetype in the first place, as one of the 13 cubes is found in the backrooms. As a reminder, the loadout to get this Corrupted Effect on your character is:
|
Archetypes |
Archetype Skills |
Relic |
Long Gun |
Hand Gun |
Melee Weapon |
Amulet |
Rings |
|---|---|---|---|---|---|---|---|
|
Explorer & Invader |
Fortune Hunter (Explorer) & Worm Hole (Invader) |
Void Heart |
Ford’s Scattergun |
Cube Gun |
Labyrinth Staff |
Leto’s Amulet |
Amber Moonstone, Black Cat Band, Anastasija’s Inspiration, & Zania’s Malice |
With all the other preparations in place, you’re now ready to hunt down those cubes of light.
It is
HIGHLY RECOMMENDED
(but not required) to clear out the entirety of the Labyrinth of enemies before starting this hunt. You’ll pretty much be wandering into every nook and cranny of this interdimensional maze, so leaving enemies alive just makes it that much more likely you’ll die and have to restart.
Cube Locations
Where Each of the 13 Cubes Can Be Found

When mentioning ‘sides’, aka left side and right side, to the main room of the Labyrinth, think of it as if you had just walked into the main room and were looking at the podium that you’ll place the Master Portal Key on.
Alright, without wasting any more time, let’s go over where each of these cubes of light is located. Keep in mind that watching the video above will give you a much better picture of their locations, but we’ve also gone over their locations in-depth in the text below as well:
|
Cube # |
Location Description |
|---|---|
|
1 |
In the ‘main’ room of the Labyrinth where you insert the Master Portal Key to reach the Labyrinth Sentinel. To the right of the Portal Key podium, look in the ‘+’-shaped hole in the wall, Cube 1 should be easily visible inside. |
|
2 |
Head to the portal that rotates through a couple of different locations following the lower left path in the main room. Wait until it connects to the portal where it looks like a floating platform floating steadily to the left. Walk in, look up at the tall outcropping of stones, and you should see Cube 2 floating near the top. Shoot it and quickly head back through the portal you entered from, as the platform does eventually disappear here. |
|
3 |
Next, head to the area where you fight Bastion to obtain the Labyrinth Spear. For those who don’t quite remember, you reach this area by heading past the rotating portal and jumping off onto the floating bridge below. Then, wait until a platform appears in front of the next gap and use it to get across. Once you hop down into the area where Bastion is found, immediately turn around and head behind the stone you came down from. Jump down to the platforms below and turn around to see Cube 3 floating at head height. |
|
4 |
Head back to the main room using the (red) portal that activated after shooting Cube 3. From here follow the upper right path all the way until you reach a portal at the end of the path. But, instead of heading into this portal, look off the edge behind it to see another portal floating vertically below. Fall into this portal to get launched onto a new platform with another portal visible ahead. Head into this new portal, go through the opening on the left, climb the stones, and follow that path (and tunnel) until you reach a closed Labyrinth door. This door leads to the Chicago Typewriter and Leto Mk II Set, but you’re not going through this door. Instead, walk up to the edge of the ground near this door and look to your right. You won’t see anything, but if you aim and then switch shoulders, Cube 4 should be easily visible to shoot just below. |
|
5 |
Head back through the portal you came in for Cube 4, jump down into the area with the World Stone nearby, and go through the portal just north of that World Stone. You should be back at the portal you went behind to head to Cube 4. Walk forward onto the floating stone bridge just a bit until the black stones on your left and right are no longer blocking your view, then turn around to your left to see Cube 5 floating just above you. |
|
6 |
Move on to the portal you used for Cube 2 and wait until it cycles to the portal slowly approaching a World Stone (that leads to the Master Portal Key). Head through the portal and jump off of the platform onto another platform area to the left. Walk to the edge of the ground here and look directly below you to see an outcropping you can land on. Carefully drop down and follow the natural path forward, making a jump across to another platform area below. Once you land walk forward until you reach the edge and look down. You should see a deactivated portal and Cube 6 directly below. Hit the cube and the portal should activate, so jump into it. |
|
7 |
Cube 7 has you taking a bit of a walk. Head back to where you first entered the Labyrinth when you got here for the first time in the campaign. Essentially, head to the main room and follow the path south of the World Stone in this room. You should come up against a dead end with a bit of raised area you can climb up onto. Climb up and go to the edge to your left before looking up and to the left to see Cube 7. |
|
8 |
From Cube 7 to Cube 8 is a very long walk. Head all the way back to the main room and then through the large portal here towards the Labyrinth Sentinel arena. Go past the arena and head all the way up to Clementine and the Observer. Walk behind them in this upper courtyard area and look out into the abyss directly behind Clementine to see Cube 8 floating there. |
|
9 |
Take a nice long walk again, this time heading all the way back to the main room. From here, go to the area where you climb up that spiral staircase and those 2 Small Golems try to charge and knock you off. Follow this until you reach the small maze that has Small Golems spawning every few feet, and go down the right path of this maze. Follow it until you see an opening to the right that looks like it doesn’t go anywhere. Hop up onto the opening, follow it to the left, and look down for some more drops. Take these drops down (should be about 4 drops total) and look to the left. Head out onto the narrow outcropping and drop down one more time. Take the leap of faith across to the lower part of the platform directly across and to the left from this outcropping, and hopefully land it. Once you do, jump across to the final platform and walk forward to see Cube 9. |
|
10 |
Cube 10 is in the backrooms AKA the Archon Archetype area. So, head through the red portal at the end of Cube 9 and walk forward to the rotating portal. Wait until it gets to the one that’s looking directly down into the abyss, count to 2 ‘Mississippi’, and walk through. You should land on an invisible bridge leading up to a portal with the backroom’s door in the area to the right. Put on the loadout and head in. Once in the backrooms, head left, take a left, take the first right, and follow this room around to the back to see Cube 10. Shoot it and wait until the backrooms eventually spit you out. |
|
11 |
Cube 11, 12, & 13 are all in the same area, which is nice. From the backroom door, head through the portal to the right and then trek all the way back to Clementine. However, at the bottom of the staircase just before the World Stone here, take a left and follow the staircase around into this small hallway. Look down, and there’ll be more terrifying drops for you to make. Take the next 2 drops and look across to a small outcropping. Aim for the edge of this outcropping closest to you, as the distance will cause you to roll on impact. Then look directly in front of you to see Cube 11 a bit below your eyeline. |
|
12 |
Turn around after shooting Cube 11, and you should see a new floating platform has appeared in front of you, hop onto it and you’ll see Cube 12 if you look up just a bit while looking forward. |
|
13 |
The last and final Cube of the Polygun treasure hunt is easy to see. After Cube 12, another floating platform should appear, hop onto it and walk to the edge to see Cube 13 just a bit above you to the left. Shoot this for another platform to appear, jump to this, and then finally jump to solid ground where the Polygun should be waiting for you just ahead. |
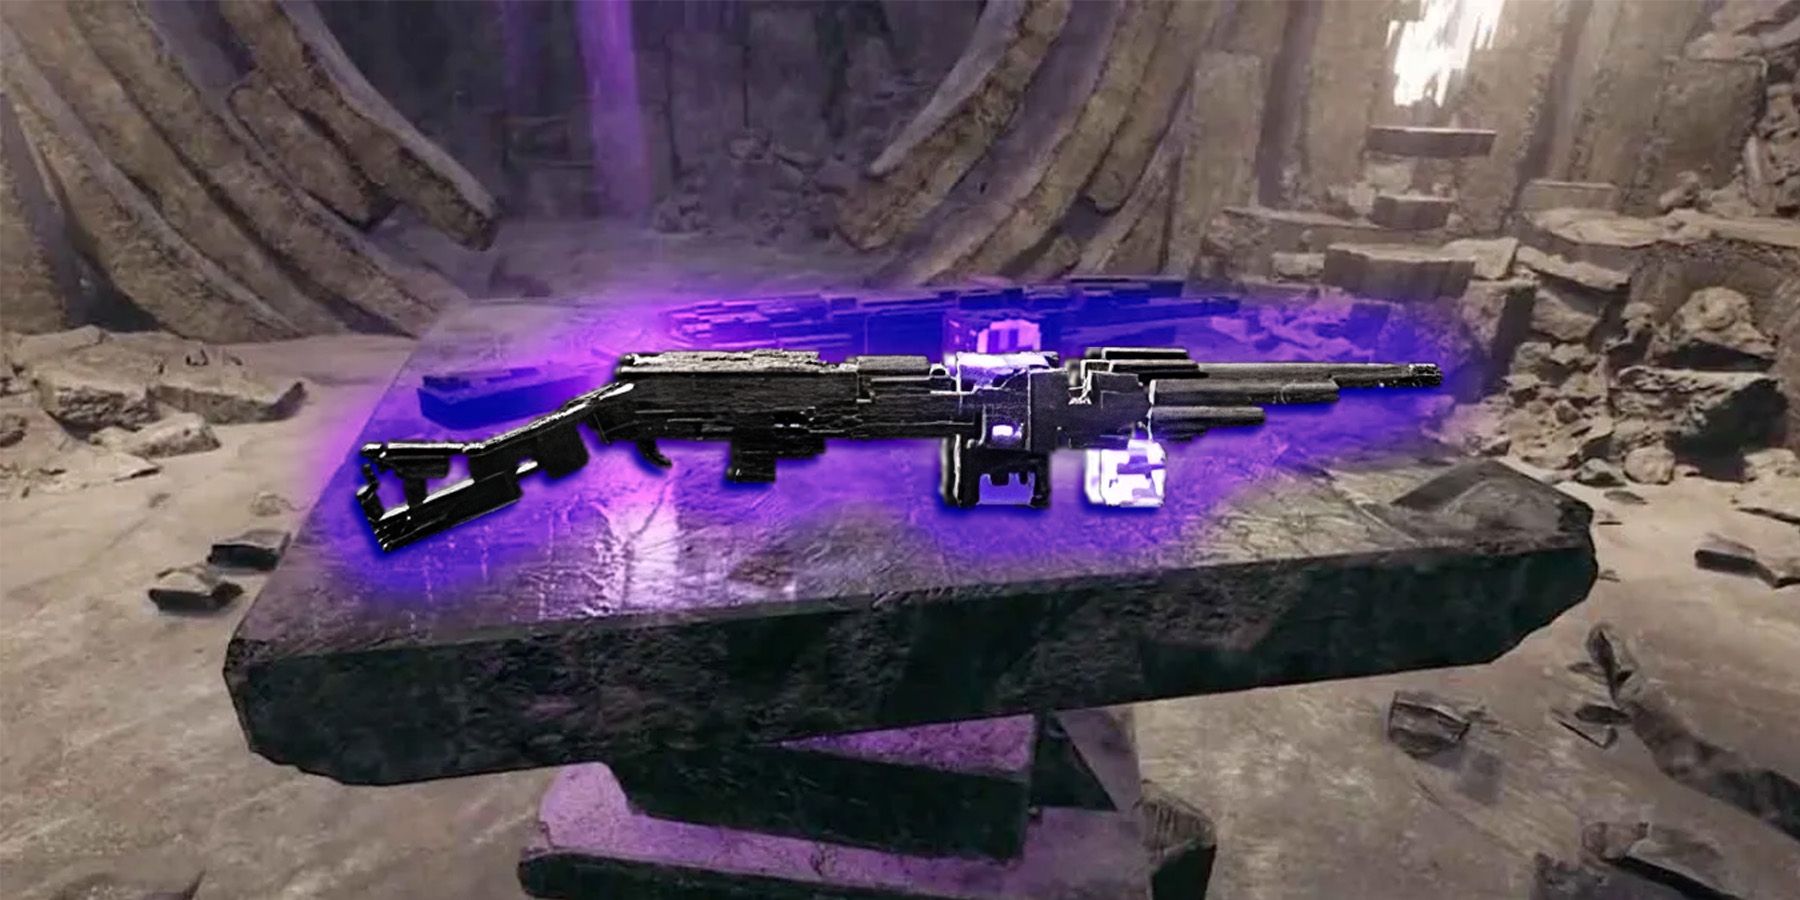
And that’s that, you have the Polygun now. Take it back to Ward 13 and upgrade it or just simply add it to your completionist collection, it’s entirely your call. If you’re wondering what our thoughts are on the Polygun or what it actually does, the last 30-ish seconds of the video at the start of this guide go over it all in detail.
Polygun Stats Overview
Weapon Mod, General Stats, Etc…

The image above shows the stats of the Polygun at +10.
|
Name |
Type |
Weapon Mod |
Damage |
RPS |
Magazine |
Ideal Range |
Falloff Range |
Crit Hit Chance |
Weakspot Damage Bonus |
|---|---|---|---|---|---|---|---|---|---|
|
Polygun |
Long Gun |
77 79 68 |
69 |
2.15 |
99 |
26 Meters |
70 Meters |
10 percent |
110 percent |
Lastly, here’s a general overview of the Polygun when looking at it in-game. In general, the gun is decent to pretty good at best, with a unique active reload mechanic that demands a lot of your attention to make use of. Compared to other DLC weapons like the Thorn Long Gun, it probably falls a bit short, but of course, that entirely depends on you.

Remnant 2
Soulslike
Third-Person Shooter
- Released
- July 25, 2023
- Publisher(s)
- Gearbox Publishing